Christmas Ornament Box Instructions

Assemble the Box
- Cut out pieces along the outlines.
- You have two choices - leave the center intact and proceed to box assembly, or cut out the center ornament view to create an opening and then fill the box with ornaments.
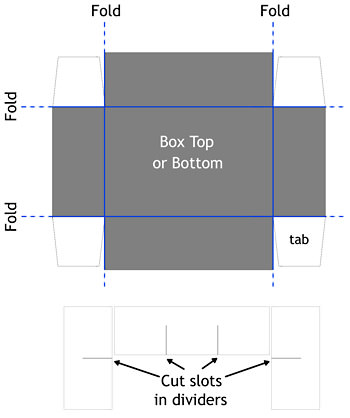
- If you want real ornaments, it's easiest to cut out the center of the box lid before assembly. Glue a piece of clear plastic over the opening on the inside of the box lid (product packaging is a great source for bits of clear plastic). - Fold along the lines as noted in the instruction diagram. Fold and glue tabs to the inside of box sides to form box and lid. If you left the center ornament view intact, you are done!
- Assemble the interior dividers if you want to fill the box with ornaments. Match up the slot in each short cross-piece with a slot in the long piece and slide together. Insert in box bottom - no need to glue - and fill with ornaments.
Create ornaments with small beads - there is no end to the variety!
- Fasten a small bead cap or a sequin over the hole in one end of the bead with white glue.
- Glue a tiny gold or silver seed bead on top of this to create the ornament "collar." Make small hanging loops with fine wire, put a tiny dab of glue on the ends, and insert into the seed bead. Let dry thoroughly.
- Put your ornaments between the dividers in the box. You can glue them in or not, as you like. You will probably have to tilt them on their sides to get the box lid to fit on well.
- Alternately, I glue in several beads with no hangers added, tilted so that the holes don't show, and just have one or two with a collar and loop on them for show.